
[ Return to Main Page ] [ Return to Projects Index
] [Doc's Machine & TWB Store] [ Contact Us ]
[ The Whiteboard Webcomic
]
Modding the Chinese K40 Laser Engraver, Part 3:
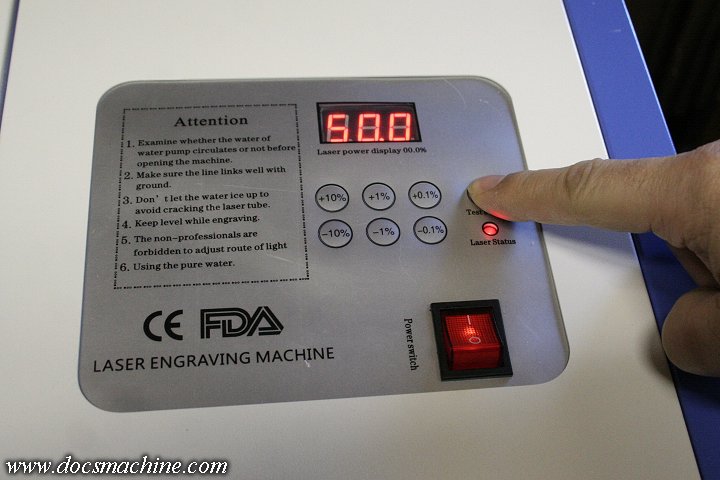
Now it was time to try it out! The control panel has a "Test Laser" button, as you'll need to pop a quick shot fairly
often when using the machine, for aiming, alignment and so on.
While I didn't have the exhaust fan set up yet, I figured a quick shot couldn't hurt. So I set a scrap of paper under
the cutting head, and pressed the 'test' button. Aaand.... nothing obvious happened. I'd expected to hear a faint
buzz or hum from the transformer when it fires, and I'd assumed, from the hot-glue smeared all over the mirror
adjustment screws, that it had in fact been aligned, and should have made a mark on the paper.
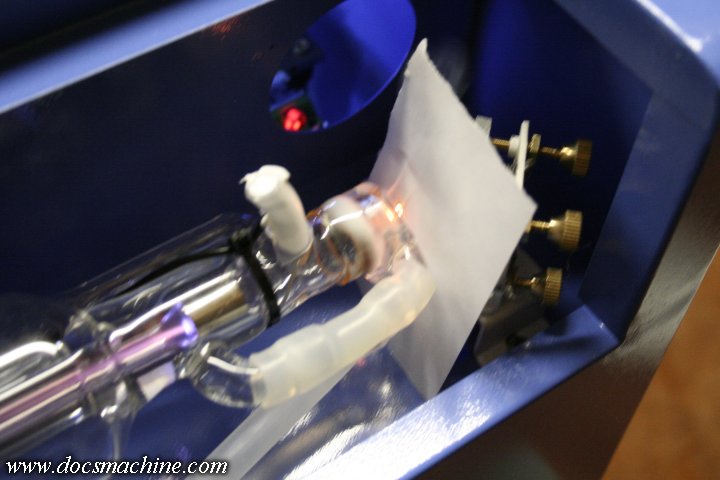
I admit I thought my machine wasn't working for a short while, but as it turns out, the beam inside the tube is
visible to the naked eye (the hopefully properly safety-glassesed eye, that is ) and is even more prominent
when viewed through a smartphone camera.
The beam itself outside the tube is still not visible, even to the camera, but the glow inside the tube
should let you know that it and the power supply are functioning.
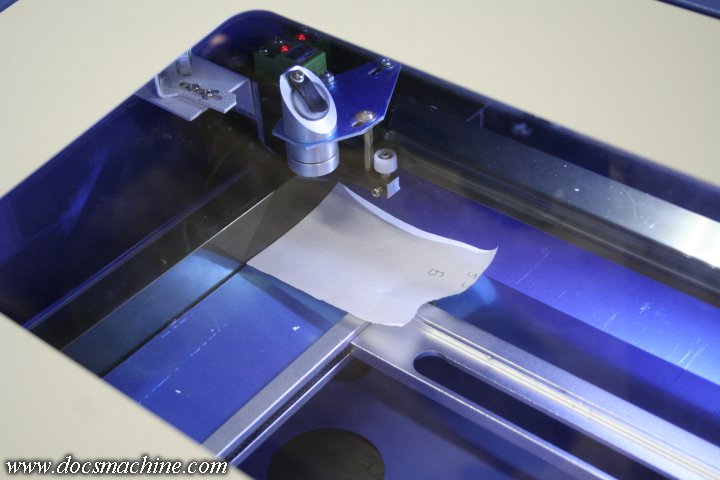
So I then slipped a piece of paper in between the laser output and the first mirror and test-fired it again.
Even at just 10% power it instantly popped a hole in the paper- and if you look close, you can see the
pinkish-purple beam in the middle of the glass tube.
Anyway, the rough alignment to the first mirror seemed okay, let's try the next one.

Yup, seems like the alignment to the second mirror is okay, so where's the problem?
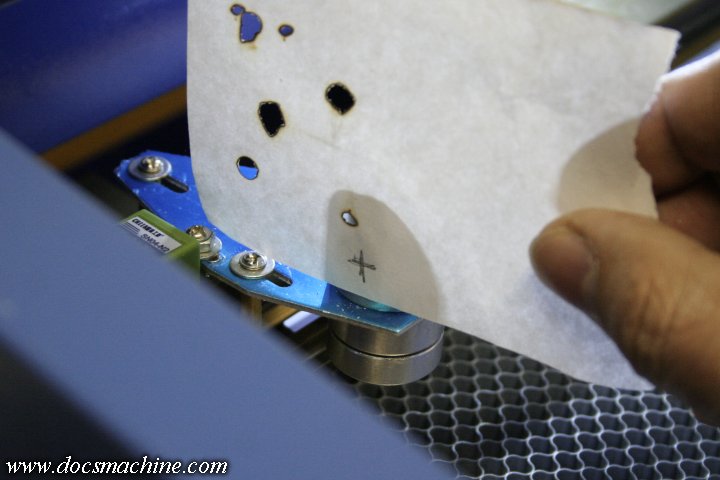
Ah, there's the problem. The crosshair roughly indicates where the beam needs to go, and the burn mark above
and to the left of it shows where it actually hits. (The beam is almost perfectly round- the erratic shape of the
holes is because the paper tends to continue to burn after the laser strike.)
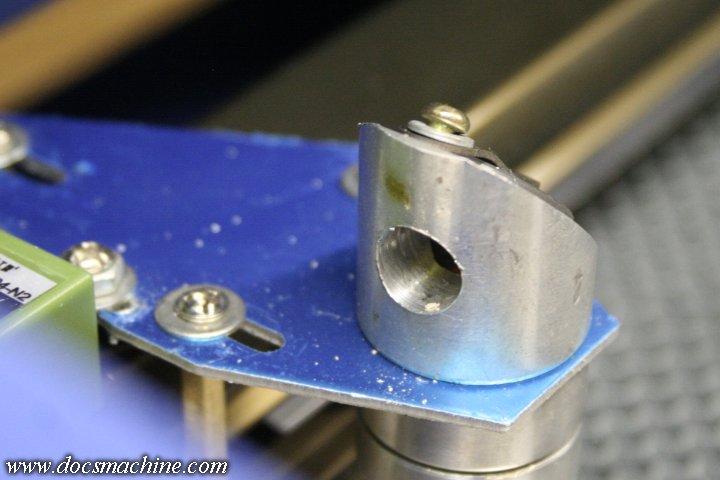
Without the paper, you can see the scorch mark (left by the paper, the laser won't mark unanodized aluminum)
well off from the proper beam path. At this point I'm not yet fully up to speed on proper laser terminology, but
I believe that is what's known as being "off by a country mile".
So I need to pry all the hot-glue off he adjuster screws, and start aligning this thing.
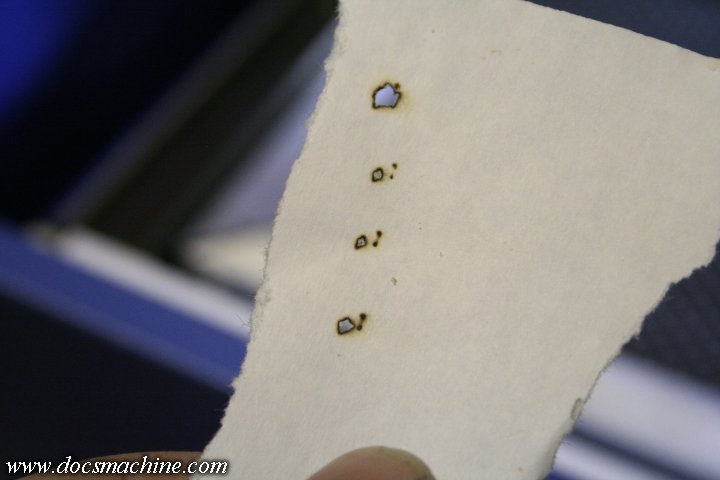
It just took a few minutes of tweak-and-test, tweak-and-test to get a reasonable alignment. I'll need to do a
proper, full-travel alignment job here shortly, but this will get things to where I can test the machine. It was
interesting that for a while I was getting an odd pattern like this. I believe the beam was striking the edge
of the mirror carrier, and "splitting" before it hit the paper.
This, by the way, is one of the reasons why you should always wear eye protection when working with
the lid open- that "split" could just as easily have been reflecting partial beams towards my face and eyes.
Modding the Chinese K40 Laser Engraver, Part 3:
Now it was time to try it out! The control panel has a "Test Laser" button, as you'll need to pop a quick shot fairly
often when using the machine, for aiming, alignment and so on.
While I didn't have the exhaust fan set up yet, I figured a quick shot couldn't hurt. So I set a scrap of paper under
the cutting head, and pressed the 'test' button. Aaand.... nothing obvious happened. I'd expected to hear a faint
buzz or hum from the transformer when it fires, and I'd assumed, from the hot-glue smeared all over the mirror
adjustment screws, that it had in fact been aligned, and should have made a mark on the paper.
I admit I thought my machine wasn't working for a short while, but as it turns out, the beam inside the tube is
visible to the naked eye (the hopefully properly safety-glassesed eye, that is
) and is even more prominentwhen viewed through a smartphone camera.
The beam itself outside the tube is still not visible, even to the camera, but the glow inside the tube
should let you know that it and the power supply are functioning.
So I then slipped a piece of paper in between the laser output and the first mirror and test-fired it again.
Even at just 10% power it instantly popped a hole in the paper- and if you look close, you can see the
pinkish-purple beam in the middle of the glass tube.
Anyway, the rough alignment to the first mirror seemed okay, let's try the next one.
Yup, seems like the alignment to the second mirror is okay, so where's the problem?
Ah, there's the problem. The crosshair roughly indicates where the beam needs to go, and the burn mark above
and to the left of it shows where it actually hits. (The beam is almost perfectly round- the erratic shape of the
holes is because the paper tends to continue to burn after the laser strike.)
Without the paper, you can see the scorch mark (left by the paper, the laser won't mark unanodized aluminum)
well off from the proper beam path. At this point I'm not yet fully up to speed on proper laser terminology, but
I believe that is what's known as being "off by a country mile".
So I need to pry all the hot-glue off he adjuster screws, and start aligning this thing.
It just took a few minutes of tweak-and-test, tweak-and-test to get a reasonable alignment. I'll need to do a
proper, full-travel alignment job here shortly, but this will get things to where I can test the machine. It was
interesting that for a while I was getting an odd pattern like this. I believe the beam was striking the edge
of the mirror carrier, and "splitting" before it hit the paper.
This, by the way, is one of the reasons why you should always wear eye protection when working with
the lid open- that "split" could just as easily have been reflecting partial beams towards my face and eyes.
 |
 |
 |
All text, photos and graphics Copyright 1998- 2019, Doc's Machine & Airsmith Services. All Rights Reserved.
Information contained in these pages is for reference and entertainment purposes only. Our methods are not always the best,
quickest, safest, or even the correct ones. It's up to you to know how to use your own machines and tools.
Keep your fingers away from the spinny blades o' death and you should be all right.